Introduction
Service Mate is an all-in-one platform for creating and managing service provider marketplaces. It is versatile and can function as a freelance marketplace, a service provider directory, or a local service provider platform. Administrators can monetize the platform through subscriptions, credits, and boosting systems. The product includes a website, mobile apps (iOS and Android), and the complete source code.
Service Mate is successfully running in multiple regions, including the USA, Africa, Pakistan, and India, showcasing its scalability and adaptability. Visit the product page for more details: Service Mate Product Page.
Documentation
The AM-technology documentation is designed to guide you through the project setup process, enabling you to swiftly launch your site.
Installation: Navigate the process of setting up the project environment.
Technology Stack: Explore the unified C#, SQL Server, Bootstrap, and Microsoft ASP.NET Core foundation.
Developer Guide: Tailored for developers, this section provides insights into project development specifics.
Release Notes: Stay updated on the latest features, enhancements, and bug fixes.
Project Purpose
- Empower businesses and entrepreneurs to build robust service provider marketplaces effortlessly.
- Provide a customizable and scalable platform for tailored solutions.
- Bridge the gap between service providers and clients for efficient service discovery and transactions.
- Streamline administrative processes for better management.
-
Enable new revenue streams for platform owners through:
- Subscriptions
- Credits
- Boosting options.
Installation Requirements
To install Service Mate, ensure the following prerequisites are met:
-
Server Requirements:
- Windows Server with IIS installed
- Microsoft SQL Server 2019 or later
- .NET Framework (4.8 or later)
-
Client Requirements:
- Latest versions of iOS and Android for mobile apps
- Compatible web browser for the admin panel (e.g., Chrome, Edge)
Installation Steps
- Download Files: Obtain the complete source code and necessary files from the purchase email or download link provided.
-
Setup Database:
Create a new database in Microsoft SQL Server.
Run the provided SQL scripts to initialize the database schema and populate initial data. -
Deploy Backend:
Deploy the backend code to the IIS server.
Configure the application settings, including database connection strings, in the Web.config file. -
Deploy Frontend:
Place the web application files in the designated web root directory.
Configure the domain settings and SSL certificate. -
Mobile App Configuration:
Update API endpoints in the mobile app source code.
Build and deploy the apps using Android Studio and Xcode for Android and iOS, respectively. - Testing: Test all features to ensure proper functionality, including payments, subscriptions, and credit systems.
Plesk Server Installation
Quick Start Guide
Install the Project:
- Quickly launch your project by opting for our hassle-free pre-installed solution with WinHost, our trusted hosting partner. Choose our hosting plan for instant access to a fully set-up project environment. Refer to our complete installation guide for detailed instructions.
Login to Admin Panel:
- Access the admin panel by logging in to your project.
Company Setup:
- Navigate to "Website Setup" > "Company Setup."
- Fill in the form, including selecting the project type, adding your company logo, favicon, name, description, address, contact details, email, and configuring SEO settings. Refer to the user guide for detailed instructions.
User Registration Setup:
- In the "Settings" section, go to "Registration."
- Configure user registration preferences, selecting options for email, phone, social media, or a combination. Consult the user guide for detailed guidance.
Category Setup:
- Head to "Catalog" > "Category Add."
- Add your project's categories using the user guide for step-by-step instructions.
Item Listing Setup:
- Now, it's time to add your first listing.
- Go to "Catalog" > "Listing" > "Add" and follow the user guide for a seamless item listing setup.
Payment Gateway Setup:
- Set up your payment gateway by navigating to "API Setup" > "Payment Gateway API."
You are now prepared to launch your project! For any inquiries or assistance, please don't hesitate to contact our support team.
Note: For more detailed instructions, refer to the corresponding sections in the user guide provided with your installation.
Technology Stack:
- Service Mate is built using the following technologies:
- Frontend: ASP.NET Web Forms, HTML5, CSS3
- Backend: ASP.NET Framework
- Database: Microsoft SQL Server
- Mobile Apps: Flutter (iOS and Android)
- Payment Gateways: Stripe, PayPal
- Hosting: Azure or AWS (recommended)
Developer Guide
Welcome to the Developer Guide. This guide provides comprehensive insights into the architecture, project structure, and best practices for developing within our application. This guide aims to empower developers by offering a clear understanding of the application's structure and functionality. Developers can expect to gain valuable insights into the technologies employed, best practices, and efficient troubleshooting techniques.
Development Environment Setup:
IDE:
- Visual Studio 2022 installed and configured.
- MS SQL Server Management Studio for database management.
- C# Programming Language support integrated into the development environment.
- Operating System: Windows 10.
IDE Settings and Configurations:
- Ensure the ASP.NET Core SDK is installed.
- Familiarity with the .NET runtime.
Database:
- Microsoft SQL Server Database 2019 or above installed and properly configured.
Package Management:
- Utilize NuGet package manager for streamlined handling of project dependencies.
Version Control:
- Version control can be managed using either Microsoft Team Foundation Server or Git.
- Familiarity with basic Git commands is essential.
- If collaborating, ensure there is a GitHub or GitLab account.
Web Technologies:
-
Solid understanding of web technologies, including:
- HTML
- CSS
- jQuery
- JavaScript
- Ajax
- Familiarity with Razor Pages for creating dynamic web pages.
Other files loaded in the Project
Pages
This folder includes various subfolders, each representing a self-contained module:
- Admin
- Advertise
- Blog
- Buyer
- Credits
- Forum
- Inbox
- Listing
- Login
- Notification
- Orders
- Page
- Payment
- PostRequest
- Review
- Seller
- Services
- Subscription
- User
Release Notes
Improvements:
- Implemented the Advanced Chat System with real-time messaging, and video calls.
- Enhanced the platform’s UI with a modern design for better user experience on both web and mobile apps.
Bug Fixing:
- Fixed a rare issue where video calls failed to connect under certain network conditions.
- Resolved bugs affecting media sharing within the chat system.
Improvements:
- Enhanced the search functionality with advanced filters, including distance-based search and category refinements.
- Optimized mobile app performance for faster navigation and reduced loading times.
Bug Fixing:
- Fixed an issue where users experienced delays in the order confirmation process.
- Resolved a bug causing incorrect time zone display on bookings.
Improvements:
- Launched the plain chat system with video calls, voice messaging, and real-time text chats.
- Improved platform scalability to handle increased traffic efficiently.
Bug Fixing:
- Fixed occasional lags in chat and video call connections.
- Resolved bugs in media uploads within the chat system.
Improvements:
- Improved seller profiles by adding options for additional information.
- Introduced email templates for custom notifications and updates.
Bug Fixing:
- Resolved a bug causing payment gateway failures during high traffic.
- Fixed issues with incorrect timezone displays in booking confirmations.
Improvements:
- Enhanced the buyer process with order history and favorites management.
Bug Fixing:
- Resolved duplicate entries in search results for services.
Improvements:
- Improved seller profiles by adding options for additional information.
- Introduced email templates for custom notifications and updates.
Bug Fixing:
- Resolved a bug causing payment gateway failures during high traffic.
- Fixed issues with incorrect timezone displays in booking confirmations.
Improvements:
- Launched the mobile apps for iOS and Android, enabling seamless on-the-go access.
- Added multilingual and multi-currency support for global reach.
Bug Fixing:
- Fixed app crashes on older Android devices.
- Addressed layout issues in mobile search results.
Improvements:
- Enhanced admin panel with tools for banner management and CMS updates.
- Improved the service review and rating system for better transparency.
Bug Fixing:
- Resolved errors in filtering search results by category.
- Fixed an issue with duplicate notifications for booking updates.
Improvements:
- Introduced a credit-based system for buyers to view seller details.
Bug Fixing:
- Fixed bugs affecting profile picture uploads.
- Addressed issues with job application notifications for sellers.
Improvements:
- Enhanced the platform’s UI for better navigation and user experience.
- Added a subscription system for sellers to access premium features.
Bug Fixing:
- Resolved a glitch in subscription billing for sellers.
- Fixed issues with password recovery emails not being sent.
Improvements:
- Introduced the first version of the admin panel, allowing basic user and service management.
- Integrated payment gateway for secure transactions between buyers and sellers.
Bug Fixing:
- Addressed bugs in the service booking flow.
- Fixed errors in displaying seller ratings and reviews.
Improvements:
- Added service listing functionality for sellers, enabling detailed descriptions and pricing.
- Implemented a basic search and filter system for buyers to find services efficiently.
Bug Fixing:
- Fixed an issue causing slow loading times for service listings.
- Resolved email notification errors for new bookings.
Improvements:
- Launched the initial version of Service Mate with basic buyer-seller interaction features.
- Introduced user registration for buyers and sellers, along with profile creation.
Bug Fixing:
- Resolved minor UI inconsistencies in user dashboards.
- Fixed issues with email verification during registration.
Here are the complete workflows
Discover how buyers and sellers connect, collaborate, and succeed with the ultimate local service provider marketplace.
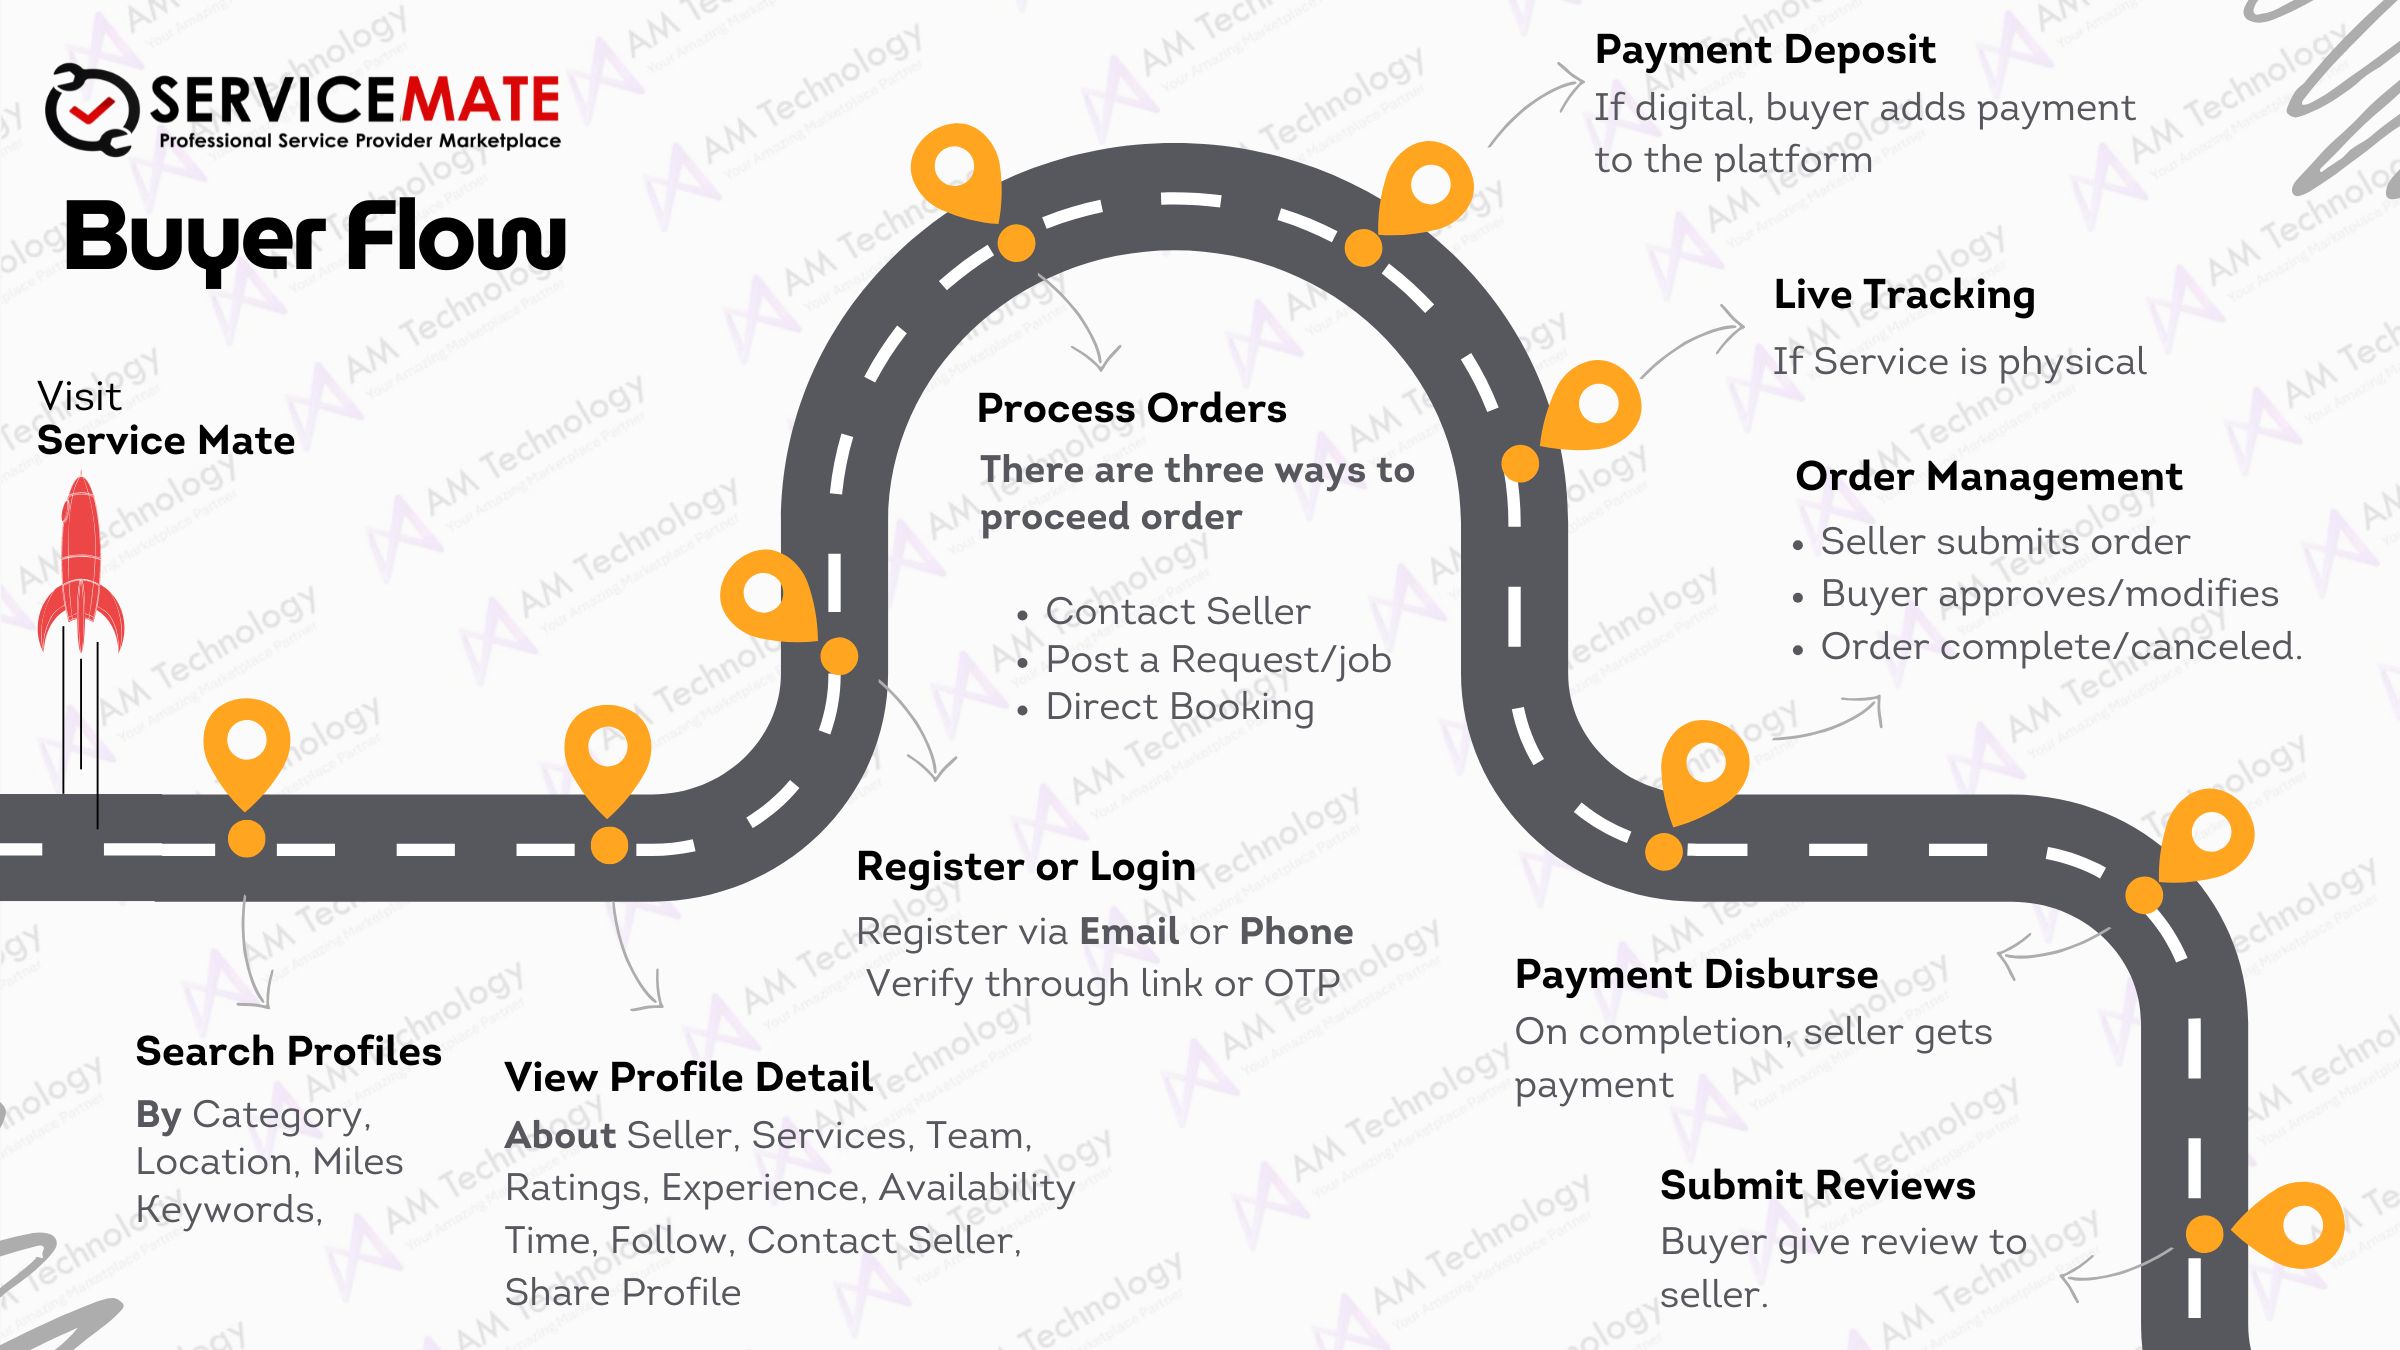
Buyer Flow
Connecting Buyers to Trusted Providers in a Few Simple Steps.
| Login Details | |
| Email: | [email protected] |
| Password: | Software@1 |

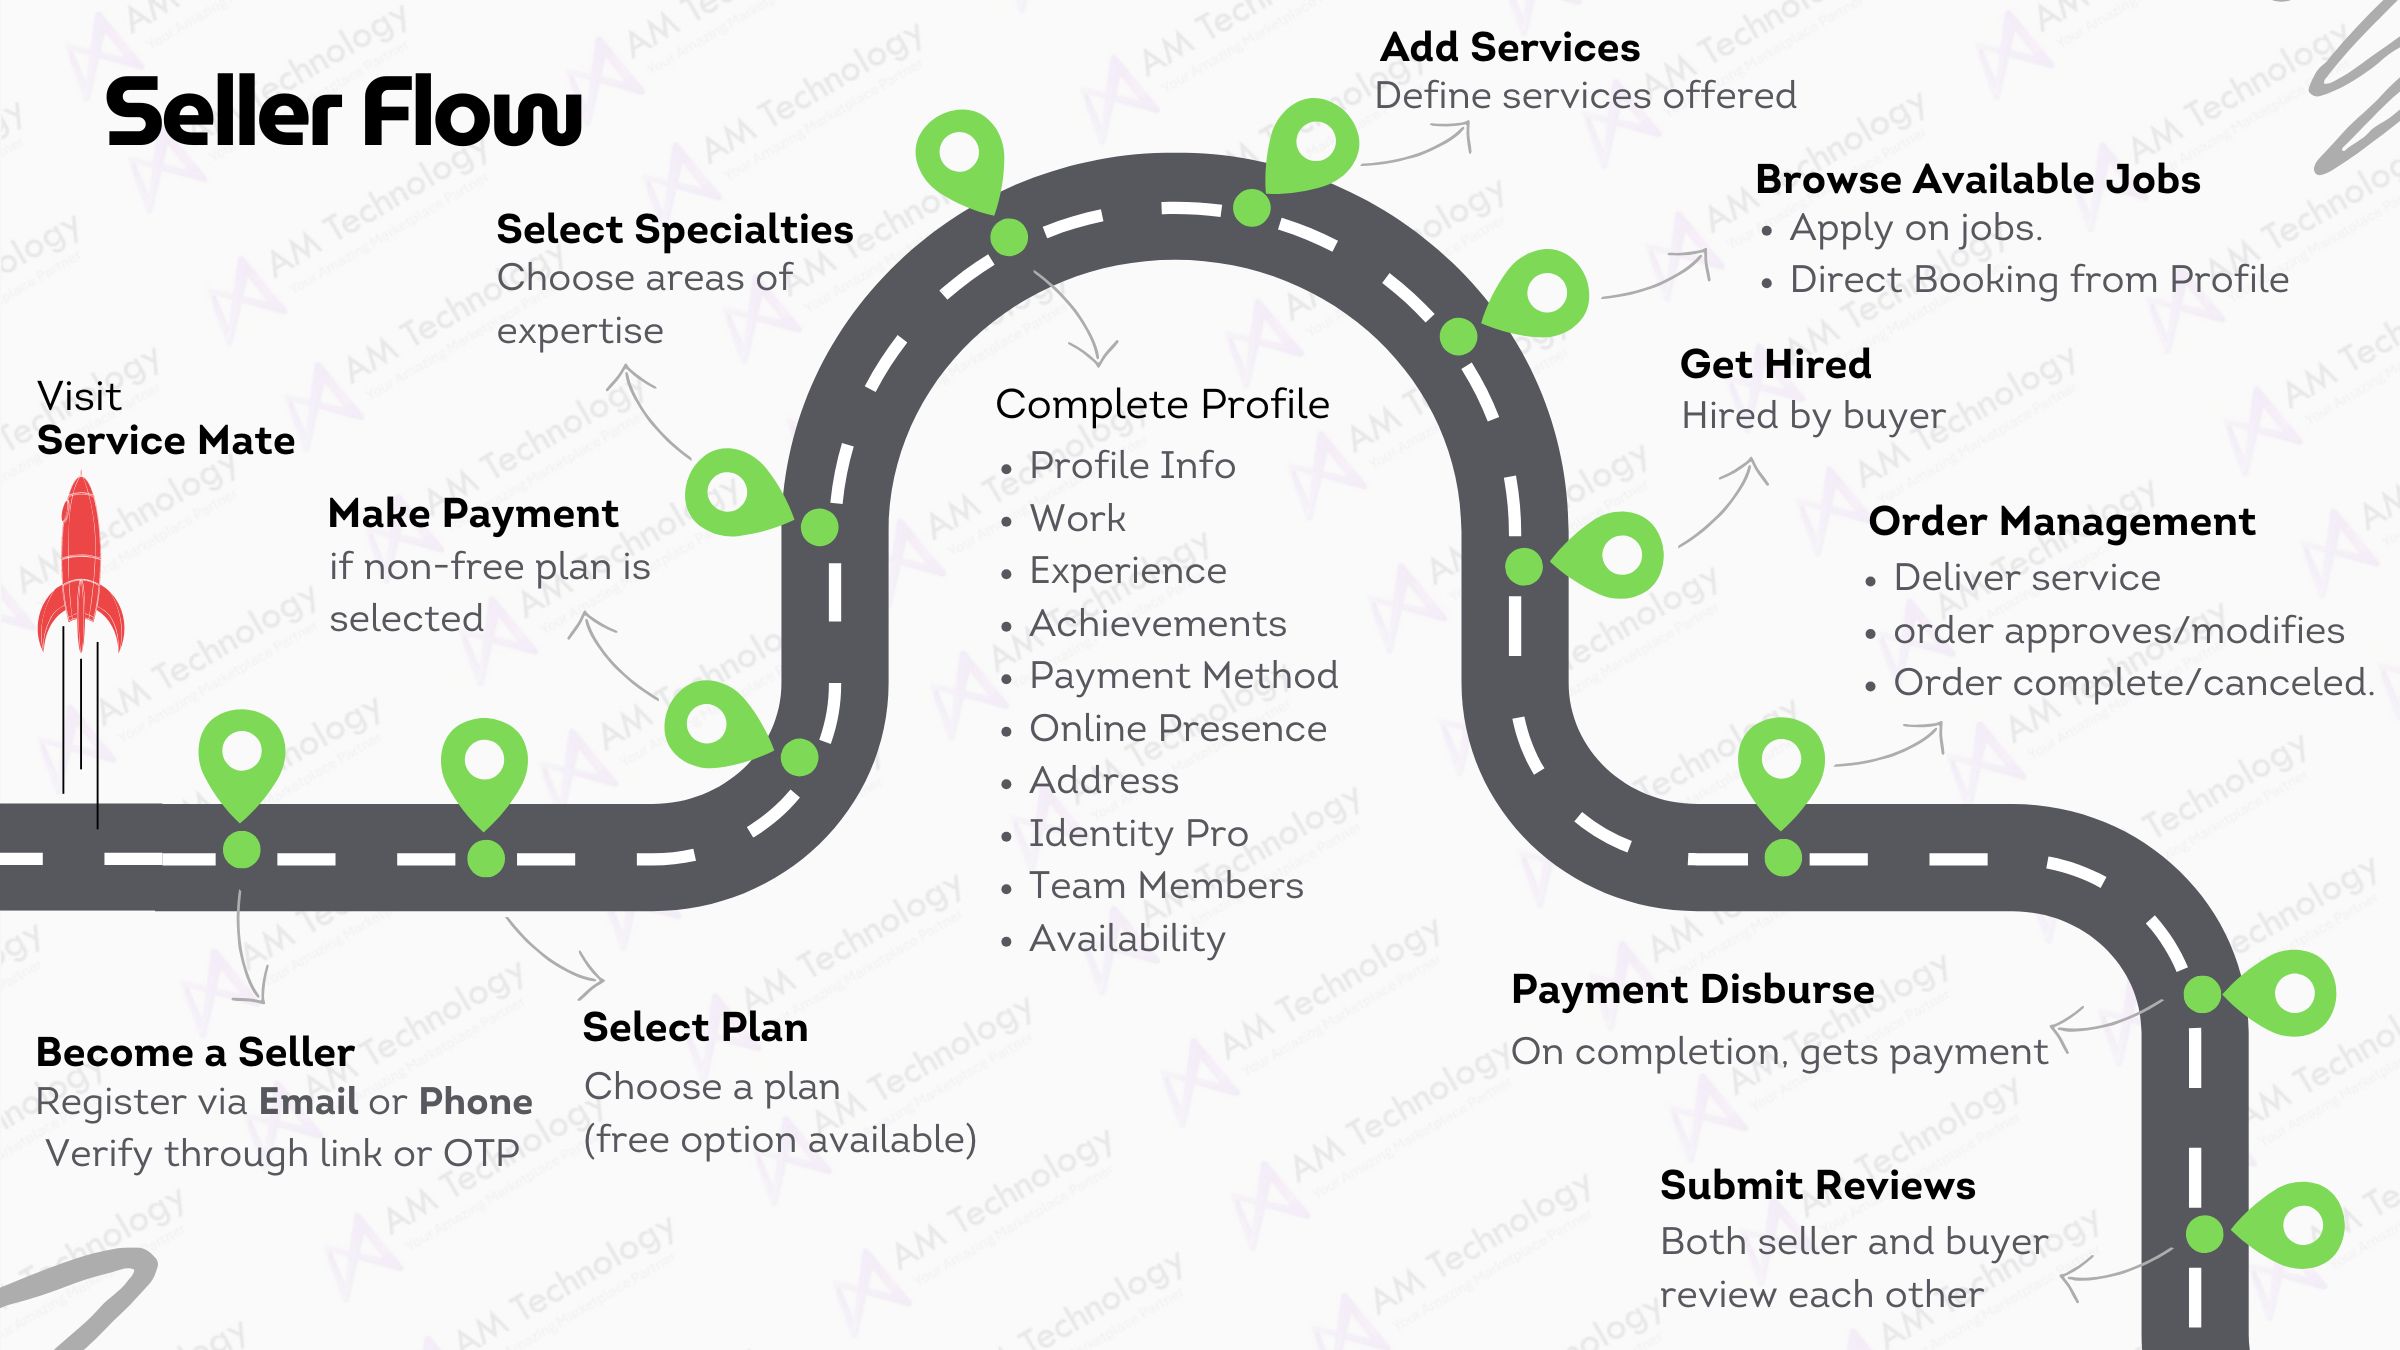
Seller Flow
Empowering Sellers: From Listings to Earnings Made Simple.
| Login Details | |
| Email: | [email protected] |
| Password: | Software@1 |

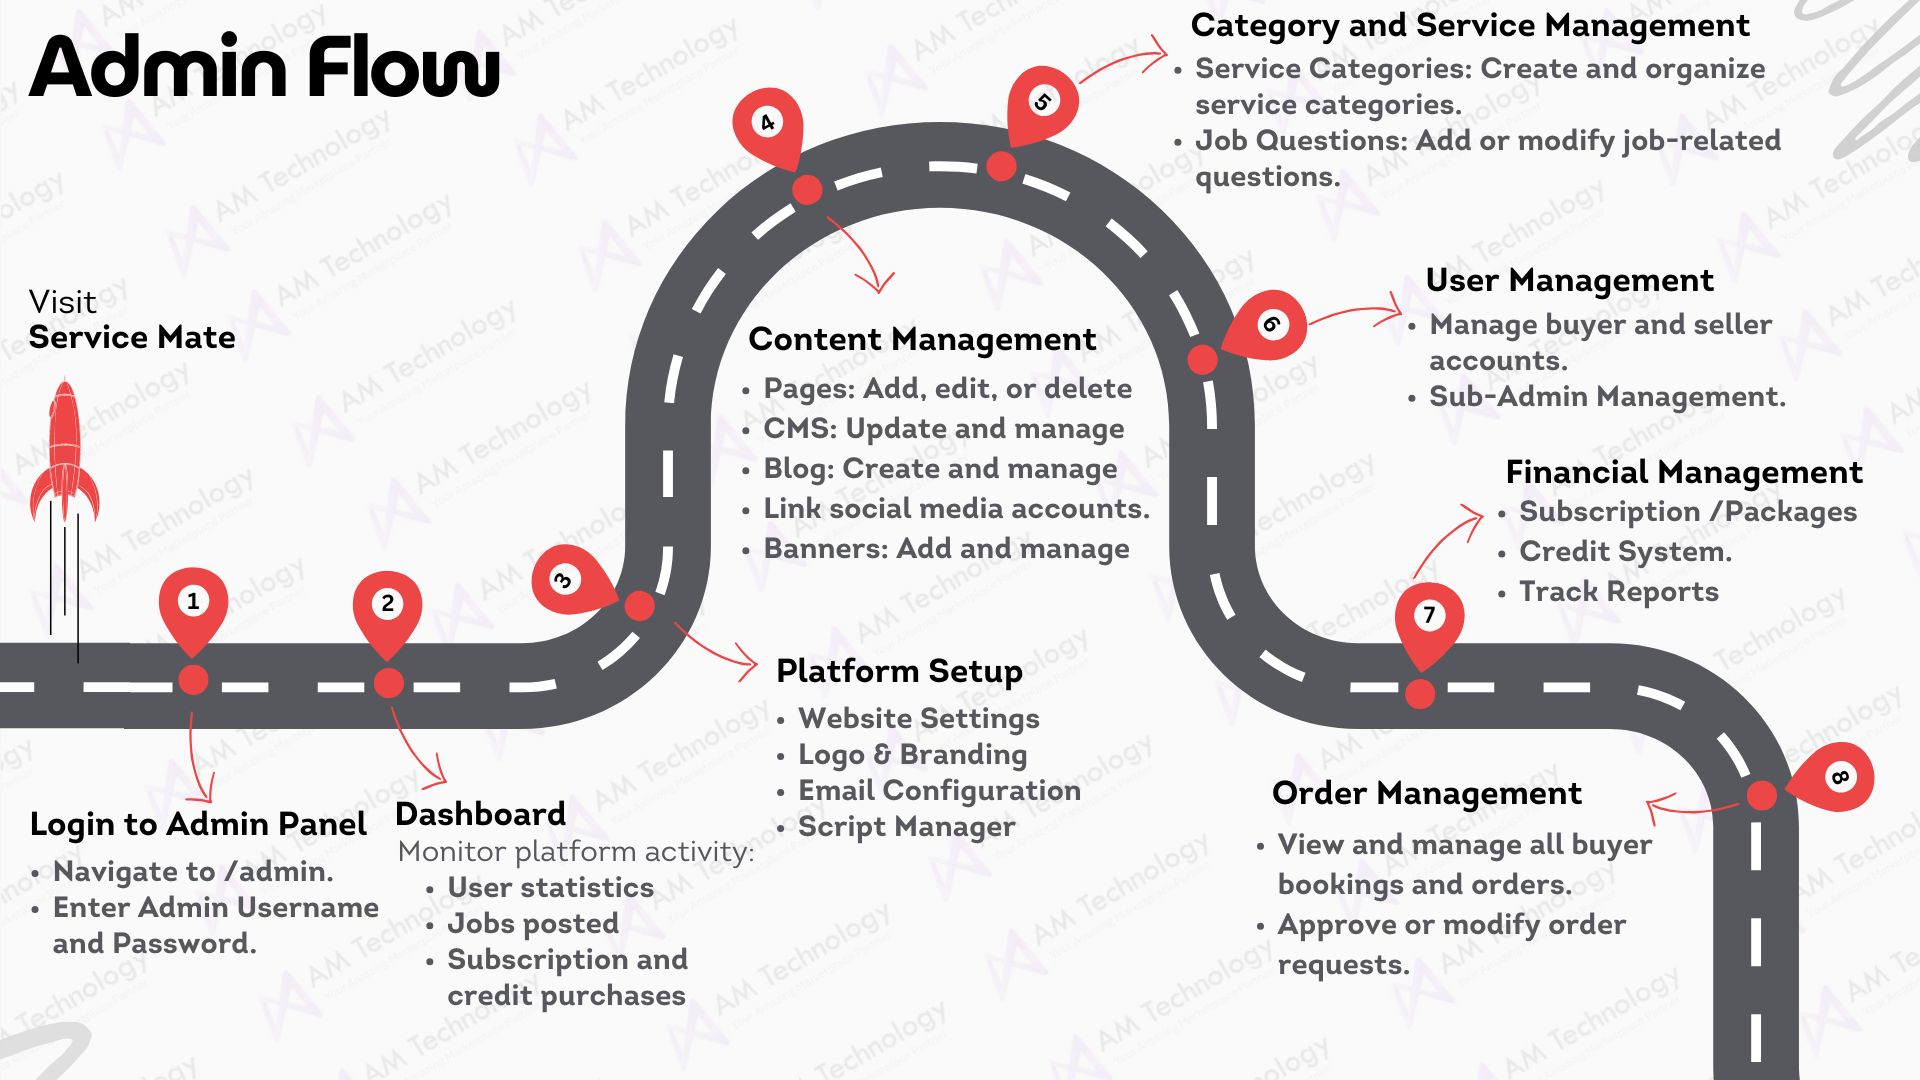
Admin Flow
Effortlessly Manage Your Platform with These Comprehensive Admin Tools.
| Login Details | |
| Username: | admin |
| Password: | software |
User Guide
Access detailed guides to help you make the most of Service Mate. Download the PDF manuals for Buyers, Sellers, and Admins to understand platform features, workflows, and best practices. Click below to get started.
Download User GuideService Mate Overview
Service Mate is a powerful ASP.NET-based platform designed for launching service-based businesses. As the exclusive provider, we offer all the tools to connect service providers with clients, helping businesses and freelancers thrive in the competitive online marketplace.
Front Panel Overview
In this video, we take you through the front-end interface of Service Mate, showcasing how users interact with the platform and navigate its features.
How To Setup Categories in Admin Panel
Learn how to set up and manage categories in the Service Mate admin panel! This step-by-step tutorial will help you organize your marketplace efficiently.
How to Mark a Seller as Featured in Admin Panel
Want to highlight top service providers on your Service Mate platform? This step-by-step guide will show you how to mark a seller as featured in the admin panel, helping them gain more visibility and attract more clients.